

Gymnastics: Handstand Phase 1: Preperation & Alignment
Ask any longtime hand balancers and they’ll tell you that consistent handstands take years to build. Yes, there are several ways to work smarter to help speed up the process – but consistent quality practice is required if you are going to master the perfect handstand. Handstands are a critical component of bodyweight training as they lay the foundation upon which gymnastics is based. It is important to correctly develop the handstand, which is why we are going to be spending a lot of time focusing on this in the Thursday gymnastics classes for the coming months.
Handstands are a fundamental part of gymnastics much like squats are a fundamental aspect of human movement. If our air squat is not perfect, it is unlikely that we will correctly execute a weighted back squat, front squat or overhead squat, not to mention the Olympic lifts. Without a solid foundation in the squat all of the other more advanced exercises will fail to develop correctly. Gymnastics handstands have the same effect on many of the other positions and techniques in gymnastics.
Just to be clear a gymnastics-style, straight handstand (HS) allows for the greatest efficiency as the joints are neatly aligned, dropping the need for excessive muscular contraction. The HS forces us to improve our shoulder flexibility, makes us engage our core, and can transfer into other more advanced gymnastics movements, unlike the banana handstand.

Performing a HS correctly improves body awareness and positioning for all other skills that are learned in gymnastics. Having a strong upper body and core is crucial to a good handstand, and having proper alignment of elbows, shoulders, thoracic, hips and toes can make handstand practice much less frustrating. In the coming months we will work though many different stages of handstand training including alignment, endurance, exciting and support, inversion, support plus inversion, and finally rebalance. Those who are new to handstands, and even those who have been doing them for a while, can benefit by working on the basics of body alignment and endurance.
Progress
Before we get started lets talk a little more about progress. In the beginning the performance of “skill-based movements” will typically fall into a bell curve based on consistent progress. For example, when we start practicing handstands we will fail all the time. Then we will improve slightly and we may start to get 2-5sec holds here and there. Further improvement leans to consistent 3-5sec holds with the occasional 9-10sec hold. The key for practicing “skill-based movements” is to raise the consistency. Our goal in the above example should be to consistently be able to perform the 5sec hold before aiming to progress. This is valuable lesson for more than just handstand training…
Consistency in performing “skill-based movements” is the key to developing greater static and dynamic movements. As humans we like to focus on our best (and Instagram it) and push the worst out of our mind. Instead we should focus on being consistent and we will progress much faster.
PART A. Wrist Preparation for Handstands
Please do NOT gloss over or skip this stuff. Your wrists were not intended to handle your entire bodyweight on them like your robust ankles were. They are a weak point that you must not neglect. You must warm them up properly and get the blood flowing through them to help get them ready. Most people often start trying to get into a handstand, not realising that their wrists don’t have the proper articulation prepared to handle the load or the range.
Since the body is going to be a rigid line like a plank of wood, we only want small movements to control the body in the air. The forearms, through the hands on the floor, will perform all of these small rebalancing movements. To allow the greatest amount of balance and control, fingers should be spread out as wide as possible and pressure exerted through the fingertips to help rebalance.
As you can imagine, only using the wrists to control the handstand will be initially difficult. Beginners will want to use their shoulders, hips and legs to change body shape to try and balance the handstand. This is to compensate for the lack of forearm strength and control required to perform a good handstand. We need to try and resist the temptation to move the body as it will instill bad habits that can be very hard to break. A proper handstand held for more than :60seconds should leave the forearms exhausted and possible the shoulders, the rest of the body should not feel taxed.
PART B. Handstand Shoulder Mobility Tests
These drills are deceptively difficult for those who are lacking the proper shoulder flexibility and/or strength of the opposing muscle groups. Even with the necessary attributes, these tests are a novel position for most people.
B1. Flat back on wall, bent knees, straight arms overhead – issue: thoracic extension, tight lats, tight pecs
B2. Flat back on wall, bent knees, 90*/90* arm position with hands flat agains the wall – issue shoulder external rotation, thoracic mobility, tight pecs
B3. Flat back on wall, bent knees, lateral arm raises – issue: tight lats, tight pec minor
B4. Stand facing the wall, toes touching the wall, knees bent, holding a stick overhead, chest and ribs down, hips extended, can you pull the stick off the wall (elbows must be straight)
PART C. Basic Shoulder Mobility
The road to balance begins with alignment. Proper flexibility and mobility training will go a long way to improving the effectiveness of your handstand. It will also help to condition the muscles, joints and tendons to minimise the chance of injury. This is needed in both barbell and bodyweight exercises and it starts to become more relevant as we get older: we start to lose a lot of strength and soft tissue extensibility and usually our posture starts to degrade. Performing high volume repetitive exercise can have a disastrous impact on our joints and posture.
One of the biggest things to keep in mind is that we want our joints, tendons, and muscles moving well for as many years as possible. Good quality body tissue should not hurt when we apply pressure or massage it. We want to be able to move pain free and train for longevity. German hangs, wall sliders and shoulder dislocations are very good shoulder mobility exercises as they all help to improve shoulder range of motion in extra, flexion and extension for handstands and manna.
 Over the coming months you are going to be hearing the cue t0“open the shoulders.” When you hear this cue we are asking you to bring the arms overhead 180° without the back arching. Short of hanging from a pull up bar, there aren’t many activities in daily life that require a full 180 degrees of overhead shoulder flexion. The average person usually only has 150°, far less than you need for a good handstand. (Not just adults but even kids these days sometimes have a kyphotic, hunchback posture due to sitting at a computer or hunching over an iPad or “Un-smart phone”).
Emmet Louis has written an awesome blog post dedicated to solely this topic which includes myofascial release, strengthening and stretching…
C1. T-spine Mobilistation aka Butchers Block, Use a dumbbell instead of a bar
C2. Cobra Stretch on the rings for thoracic, pecs and lats, :60sec hold
C3. Side lying Cobra Stretch on the rings for thoracic, pecs and lats, :60sec each side hold
PART D. Strengthen the Shoulders
[2-3] Rounds of: 8 reps at a 4021 tempo, rest as needed between sets
A1. Cuban Rotations – use DB’s or a weighted stick
A2. Single Arm DB/ Weight Plate 30* Trap-3 raise (push palms towards the roof)
A3. Banded Specific Rear Delt Pull Aparts
PART E. Body Alignment
Normally, your spine has many sexy curves like this…
![Look at all those [natural] curves.](http://antranik.org/wp-content/uploads/2014/08/curves-natural-spine.jpeg)
But in a STRAIGHT handstand we want the spine (notably the lower back) to be flat. We literally want the bones stacked on top of each other so the muscles don’t have to do as much work. That’s how handstands can become effortless…
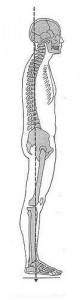
To help achieve a flat back, we must recreate “Posterior Pelvic Tilt” (PPT) in the hips:
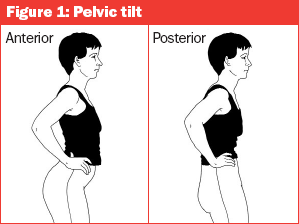
Anterior tilt will make your butt stick out and your back arch. Posterior will make your bones stack up perfectly.
With the following alignment drills the goal is to remember what the position feels like, and what you have to engage to get into position and stay there. Once you get inverted, finding the position will not be as simple as many may think. Alignment in a handstand is something that can be continuously worked over the years of your practice. The alignment drills listed can be performed as a warm-up, cool-down or in between sets as a reminder.
You may recognise the following exercise as a modification of the standard gymnastics hollow body position. The basic hollow body position is a great exercise for core training, but it does not simulate the alignment of the handstand.
E1. Reverse Plank Holds, focus on PPT and a straight body
E2. Back Body Line Drill, with a stick, head must be on the floor, focus on PPT and a flat back
E3. Front Body line Drill, with a stick, focus on PPT, trying to bring the belly button back towards the spine and flatten the lower back
PART F. Hand Support and Endurance
Before we get to the part you’ve all been waiting for, the handstand, we need to cover the basics of hand support. The goal is to find a position where the body can hold itself up using its own structure rather than muscular effort.
F. Push-up (FLR) [:40-:60sec]
The often underrated push-up position is the easiest way to begin to learn proper arm support concepts, with the added body alignment when performed correctly. We want to create a structure that does not collapse under increased load; a concept we can later take to our handstand.
Here is what I look for in a pushup position:
Arms shoulder width
Shoulders directly above the hands
Elbows locked
Scapula protracted
Posterior pelvic tilt
Open hips
Straight knees
Toes pointed under
Yes it’s a long checklist, and it could easily be made more complex if I wanted to. The reason for being so picky with the pushup position is that it is very simple to perform, but easy to perform “wrong”. By that, I mean it reinforces the habits that will make the advanced bodyweight skills more difficult to learn.
One more concept that is important to understand in this position of the shoulders compared to the base of the hands. Play with positioning of the shoulders and understand what it feels like when the shoulders are above, in front, or behind the hands. Shoulders directly above the hands is ideal and the wight in the mid-hand postion.
F. Frog Stand or Crow Pose [:15-:30sec]
To perform the frog stand, start on all fours with elbows slightly bent and shoulders in front of the hands. Place the knees on the top of the elbows so that they may rest there. If the knees are not supported by the elbows, the frog stand becomes increasingly difficult to hold.
Once the desired position on all fours is achieved, start to lean weight forward towards your hands until your feet bear less and less weight on the floor. Once you have the sense that your feet are weightless but still touching the floor, bend your knees further to lift the feet into the final position.
The crow pose is a great bang-for-your-buck exercise when it comes to building strength in the wrists and upper body, learning to breathe in difficult positions, and improving balance and awareness of your body in space. GMB have a great article here.
F. Wall Facing Handstand Holds [:30-:60sec]
It is IMPORTANT to properly develop this movement, which is why it is the first handstand skill movement in this new handstand phase. Wall facing handstand should be performed with the following technique notes in mind:
Note: Beginners want to have the tips of their toes touching the wall and nothing else. With hands as close to the wall as possible, and straying from proper, straight body is easily identified. If we arch, our stomachs consistently hit the wall or we are forced to come down with a forward roll or a pirouette.
- Hands should be shoulder width apart, fingers should be spread out as far sas possible
- Chest to the wall
- Hands as close to the wall as possible without tipping over
- Elbows are locked and arms a straight
- Shoulders are elevated, think of pushing the hands away from the shoulders as far as possible, the shoulder should cover the ears like earmuffs
- Thoracic spine neutral or slightly extended, keeping the rips down and the core hollow
- Slight posterior pelvic tilt (PPT). The back is usually curved and mildly extended when we are standing, this should be a gently reverse in the handstand position. To cue this motion we simultaneously squeeze the glutes and tense suck in the stomach (hollow), trying to bring the belly button back towards the spine. This is the best cue to help eliminate the arch (a common error in handstand practice).
- Legs straight with feet and knees together so that the are in line with the rest of the body. There is a small amount of leeway here: the hip may need to bend to allow the toes to touch the wall, the close the hands are to the wall the less this will happen
- Knees locked straight and toes pointed to help keep the body in a tight alignment. The legs themselves can be squeezed together to generate tension and help maintain correct handstand alignment.
All of these body cues summarise the position that we want to be in for the handstand, A STRAIGHT LINE – NO BENDING ANYWHERE IN THE BODY